Testing
Last Updated: Jan 10, 2026
Ensuring our code works as intended
We have a few testing methods within the ink ecosystem:
Each uses a different framework so it's important to determine which kind of testing is appropriate for your use case
The ink ecosystem contains several environments:
- Docs: A place for ink users to learn about components, props, and find usage samples and guidelines
- Exposé: An internal tool used for visual testing
- Playroom: A prototyping tool that allows users to test ink components simultaneously across a variety of screen sizes
- Plain-text: Used for rendering code examples in documentation guidelines pages
Our end-to-end and visual regression tests both interact with the Exposé environment
We use Testing Library with Jest as our testing framework. Testing Library encourages testing components the way users interact with them, focusing on accessibility and user behavior rather than implementation details. Unit tests are predominantly used to test non-visual component behavior and React hooks.
When to write unit tests
- To test an individual isolated "unit" of code. Unit tests can be run independent of their test suite, without a need for other "units" to be complete
- To mock interactions with external dependencies (such as libraries, databases, etc)
- To test a method's input and output
- To verify whether a method impacts a component's state
Best practices
Tests for each component should live in a <component name>.spec.tsx file within the same folder of the component
Don't
Don't reference CSS IDs or class names. CSS identifiers of Ink components are subject to change without warning. Majority of our components are now styled which uses a dynamic and unique identifier. Referring to these identifiers in other code, such as unit tests, makes the other code more fragile.
- Don't use snapshots to test html outputs
- Don't add a test for test sake! Each test has a purpose
Do
Each test within a suite should test a single function or component behavior. Use selectors that resemble how users interact with the code, such as labels and content text. Read more here or here.
- Use
describeto group tests with similar aspects- For example
structure,behavior,callbacks, etc - One or two words are enough to describe the concept being tested
- For example
- Use
itas the test executable but don't use thetestkeyword- Generally a short sentence to describe the expected result of an assertion
- Use
arrange,actandassertpattern to write your unit tests- Group statements accordingly with an empty line between them
- Prefer accessibility-first queries like
getByRole,getByLabelText, andgetByText - Use
userEventfor simulating user interactions instead offireEvent - Use
waitForfor testing asynchronous behavior - Use
screenqueries to access rendered elements
Example
Dropdown.spec.tsx
import React from "react";import { render, screen, waitFor } from "@testing-library/react";import userEvent from "@testing-library/user-event";import { Button, Dropdown } from "../..";describe("Dropdown", () => {describe("structure", () => {it("should render its children", () => {// Arrangerender(<Dropdowntrigger={({ onClick }) => <Button onClick={onClick}>Open</Button>}/>);// Assertexpect(screen.getByRole("button", { name: "Open" })).toBeInTheDocument();});});describe("behavior", () => {it("should open the items when you click on the trigger", async () => {// Arrangerender(<Dropdowntrigger={({ onClick }) => <Button onClick={onClick}>Open</Button>}><Dropdown.Item render={() => <span>First</span>} /></Dropdown>);// Assert initial stateawait waitFor(() => {expect(screen.queryByText("First")).not.toBeInTheDocument();});// ActuserEvent.click(screen.getByRole("button"));// Assertexpect(screen.getByText("First")).toBeInTheDocument();});});})
How to run unit tests locally
To run the entire test suite:
yarn testTo see the tests coverage as well as the tests results:
yarn test:coverageTo run a specific component/test suite, pass a pattern to the command such as the name of a component or the path to the file you're trying to run:
yarn test <pattern>We use Cypress
When to write end-to-end tests
- To test the execution of a component from start to finish
- To mimic real-world scenarios and user interactions
- To test communication between components and the database, APIs, network, and libraries
- To test accessibility as the engine "sees" the same things that a screen reader would (for the most part)
Best practices
All tests are named as <component name>.cy.js and live within the cypress folder. We use this to replicate expected user behavior and all tests are ran against the Expose environment.
Don't
Don't reference CSS IDs or class names. CSS identifiers of Ink components are subject to change without warning. Majority of our components are now styled which uses a dynamic and unique identifier. Referring to these identifiers in other code, such as unit tests, makes the other code more fragile.
- Don't test components that are purely visual
- Don't use for projects that don't render a UI, such as custom hooks
Do
Use selectors that resemble how users interact with the code, such as labels and content text
- Make assertions and use
.should()to do it - If you can't find an element using the component name, use the attribute
data-testid- Example:
cy.get('table[data-testid="your-data-testid"]')
- Example:
- Use
describeto group tests with similar aspects- For example
structure,behavior,callbacks, etc - One or two words are enough to describe the concept being tested
- For example
- Use
itas the test executable but don't use thetestkeyword- Generally a short sentence to describe the expected result of an assertion
Example
cypress/e2e/filepicker.cy.js
Cypress.config("baseUrl", `${Cypress.config().baseUrl}FilePicker`);describe("FilePicker", () => {describe("behavior", () => {it("should be able to receive dragged and dropped files", () => {cy.get("input[type=file]#filepicker-default").selectFile("cypress/helpers/sampleFile.json",{action: "drag-drop",force: true,});cy.get("li").contains("sampleFile.json").should("exist");});it("should remove a file when clicking on `Remove`", () => {cy.get("input[type=file]#filepicker-default").selectFile("cypress/helpers/sampleFile.json",{action: "drag-drop",force: true,});cy.get('ul[data-testid="filepicker-default-files-list"]').should("exist");cy.get('ul[data-testid="filepicker-default-files-list"]').find('button[aria-label="Remove"]').click();cy.get('ul[data-testid="filepicker-default-files-list"]').should("not.exist");});});})
How to run Cypress locally
Cypress tests run against the Expose, so, we must run Expose:
yarn start:exposeAssuming you are running Expose on port 3000, you'll open a second terminal window to run Cypress:
yarn e2e:localIf you want to run Cypress against a different port, you can modify using:
yarn e2e --config baseUrl="http://localhost:<your-port>/"Cypress will open a UI where you can select E2E testing, choose a browser, and pick which tests to run. Tests run live and automatically re-run when you modify code. Note that sample changes require restarting Expose since samples need to be scraped.
Note:
sometimes tests ran in CircleCI yield different results as CircleCI is running tests in "production" modeWe use BackstopJS to collect sample snapshots from our internal testing environment, Exposé. The goal is to cover as many visual variants in each component as possible through atomic sampling allowing us to check for cascading visual effects.
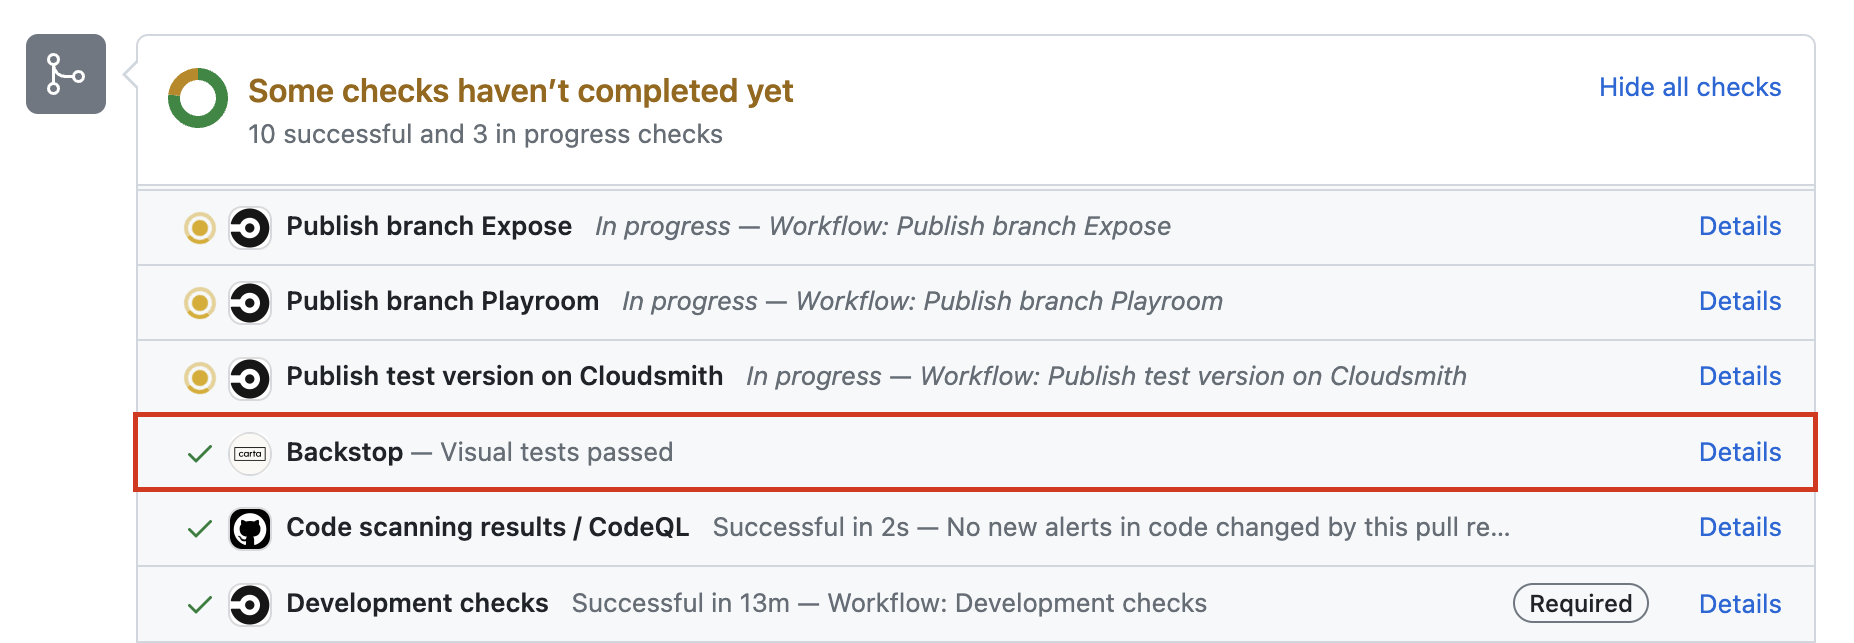
CircleCI runs Backstop in every ink PR and it's mandatory that Backstop is passing before a merge
When to write visual regression tests
- When a component has visually changed in any way
- To test visual interactions such as opening dropdowns, clicking buttons, selecting checkboxes, etc
We are predominantly looking for unexpected changes to the visuals
Best practices
There are only two ways to generate a snapshot;
- All Exposé sample snippets snapshots on load (default state)
- Additional scenario tests added to the corresponding
<component name>.backstop.jsonwithin the backstop-references folder
Naming test scenarios
Names of each scenario must be unique!
Note: Exposé sample snippets and backstop scenarios (added via .backstop.json) don't conflict as they are namespaced to their respective environment
Our custom schema
We use a custom schema to make matching our Exposé sample snippets easy. A script is ran in the background to convert it to Backstop's format.
sampleName: references the exact sample name in thesamples.jsfile.state: indicates the state of the sampleselectors: required only if it's not the sample name, such as 'viewport'
Example
Let's say our NewTable component has 2 samples, "Base NewTable" and "NewTable with twiddle rows"
NewTable/samples.js
[{group: "NewTable",name: "Base NewTable",environments: ["expose"],code: `<NewTable/>`,},{group: "NewTable",name: "NewTable with twiddle rows",environments: ["expose"],code: `<NewTable/>`,},]
This produces 2 snapshots by default
However, this only snapshots the initial state.
If we want to snapshot additional visual checks for the scenario "NewTable with twiddle rows", we need to add them as follows:
NewTable.backstop.json
[{// The original sample is named "NewTable with twiddle rows" and// we're testing the visual when a single is expanded row"sampleName": "NewTable with twiddle rows""state": "Single row expanded","clickSelector": "#twiddle-table tbody > tr"},{// The original sample is also "NewTable with twiddle rows" but this time// we're checking the visual when all rows are expanded"sampleName": "NewTable with twiddle rows""state": "All rows expanded","clickSelector": "button[data-testid='expand-all']"},]
With these additional 2 additional scenarios, we now have 4 snapshots in total
Unfortunately this task isn't automated so if you update a sample name, you must also update the corresponding backstop scenario names.
Breakpoints
Similar to how we can set different environments[] in each sample snippet, we use the key breakpoints[] to include snapshots at various screen sizes.
By default, we snapshot at the desktop size. Additional options include:
breakpoints: ['mobile', 'tablet-portrait', 'tablet-landscape', 'desktop-large', 'ultra-wide'],Technical note: Backstop uses viewports but to align ourselves between sample snippets and additional scenarios, breakpoints is used in both places
Example
We know that Autograph's "Sign here" flag hides itself in mobile only, so we will add a snapshot to each breakpoint available to ensure that's the case:
Autograph/samples.js
[{group: "Autograph",name: "Default Autograph",environments: ["expose"],breakpoints: ["mobile","tablet-portrait","tablet-landscape","desktop-large",],code: `<Autograph preventAutoFocus name="Tagg Palmer" id="autograph-default" />`,},]
1 (desktop) by default + 4 breakpoints = 5 total snapshots for this single sample
Skipping sample snapshots
There are only two reasons to use a skip:
- The test is flaky
- with
skipFlakyBackstop: true - If this flag is used, add a comment with context and links if applicable. File a Jira ticket so we can circle back to fix the regression test.
- with
- The initial testing state is irrelevant
- with
skipInitialBackstop: true
- with
Example
We usually need a trigger to open a component like Modal. We don't need to screenshot the trigger itself (in this case a Button), so we can skip the initial state:
Modal/samples.js
[{group: "Modal",name: "Base Modal",skipInitialBackstop: true,environments: ["expose"],code: `() => {const [isOpen, setOpen] = React.useState(false);return (<><Button onClick={() => setOpen(true)}>Open Modal</Button>{isOpen && <Modal />}</>);}`,},]
Results in 0 snapshots so far
Modal.backstop.json
[{"sampleName": "Base Modal","clickSelector": "button",// Instead the sample itself, we want the whole screen so we must add:"selectors": ["viewport"]}]
Total of 1 screenshot
Scenario options
Here are a few options we commonly use:
[{"sampleName": "Component with dropdown","state": "active",// Perform one or more clicks before capturing the snapshot"clickSelectors": ["#button1", "#button2"]},{"sampleName": "Component with buttons",// Scrolls to the given selector before taking the snapshot"scrollToSelector": "#component-with-buttons"},{"sampleName": "Component that hovers","state": "hover",// A snapshot of the hover state can be captured by a snapshot"hoverSelectors": ["#button1", "#button2"]}]
See Backstop's documentation for all available options
Consistent capture
We want our snapshots to be consistent which means we have to simulate the test to hold the given state (e.g. hover, active, focus) on capture. Sometimes this requires modification to ignore focus rings or animation delays in order to not produce flaky tests.
- Appending an outside selector at the end of
clickSelectors[]to prevent focus rings. For example, all samples display auseWindowWidth()value in Expose. This is currently asmallelement which we double as a way to click outside the sample. - A
scrollToSelectorselector might be needed when used withviewportsnapshots to consistently snapshot the sample at the same position on a given page - Add a
postInteractionWait(can be a selector or a time in milliseconds, none by default) to delay capture if a component requires multiple clicks or an animation to complete - Add a
delay(none by default) as a last resort
Custom Exposé page
For cross-component testing (e.g., Disabled states), create a custom Exposé page in src/Expose/extra-exposes, add it to the samples object and routes, then create a corresponding backstop.json file.
How to run Backstop locally
⚠️ Although the idea of Backstop is to test against a reference, we can run a singular copy for sanity checks such as naming issues. The local snapshot doesn't produce the same capture as the one ran in CI.
(No comparison) Snapshot for debugging purposes
Must be running Expose first
yarn start:expose(Optional, in a separate terminal window) To skip rebuilding each time there are sample changes:
yarn scrape watchIn a separate terminal window, run backstop (with desired flags)
yarn backstop:test:local(Comparison) Test against local master as a reference
The reference can actually be any branch but using master as the example:
// This command builds the Exposé for master and serves it at localhost:8000yarn expose:build && yarn expose:serve// Create reference snapshotsyarn backstop:reference
After all reference snapshots are created, you can stop the Exposé and switch to the branch you need to compare:
$ git checkout your_branch_name// This command will start Exposé again but on your_branch_name this time$ yarn expose:build && yarn expose:serve// Run against the master references we created earlier$ yarn backstop:test
Running selective tests with --filter
Use --filter to run specific tests by component name, sample name (kebab-case), viewport, or environment (-expose or -backstop):
$ yarn backstop:test:local --filter=button$ yarn backstop:test:local --filter=button-with-icon
Failing tests
Valid failing tests:
- New samples because there was no prior reference
- Modifications to a sample's name will generate a new filename (this is used to make snapshots unique)
Always check the report (local or on CI) and review each failing test. If you don't know why something are failing, ask for help.
Example of failing a Backstop suite:
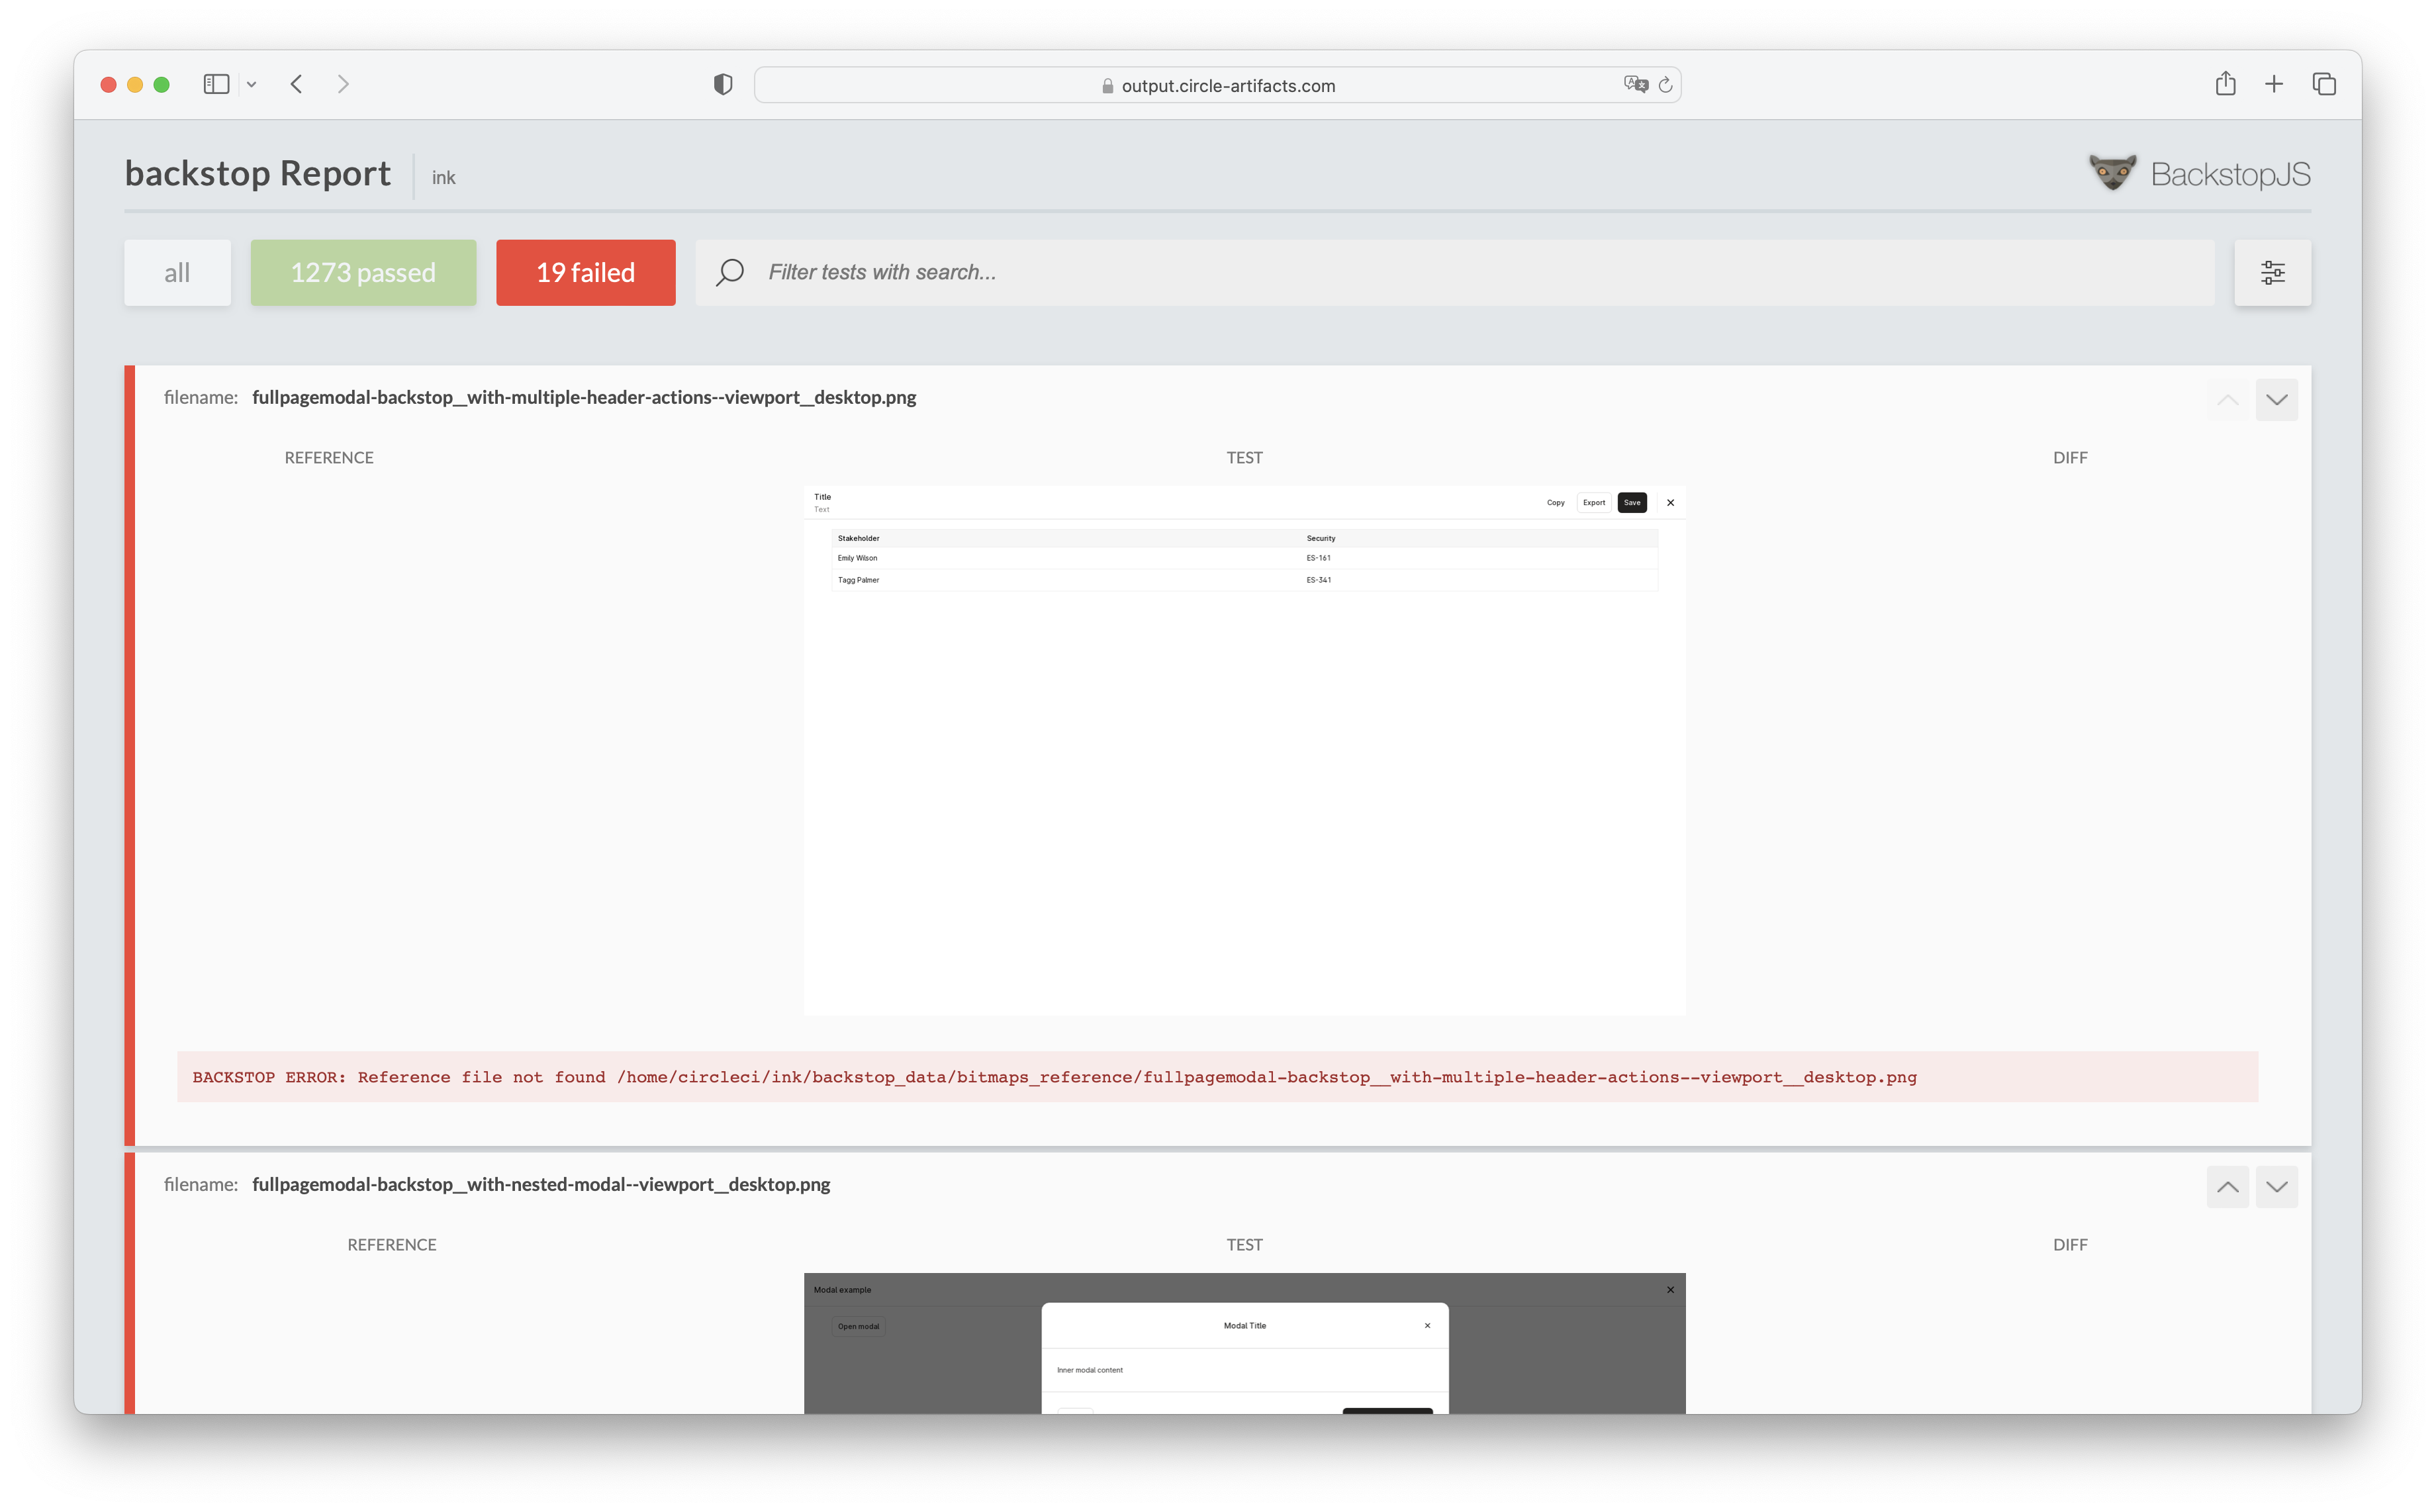
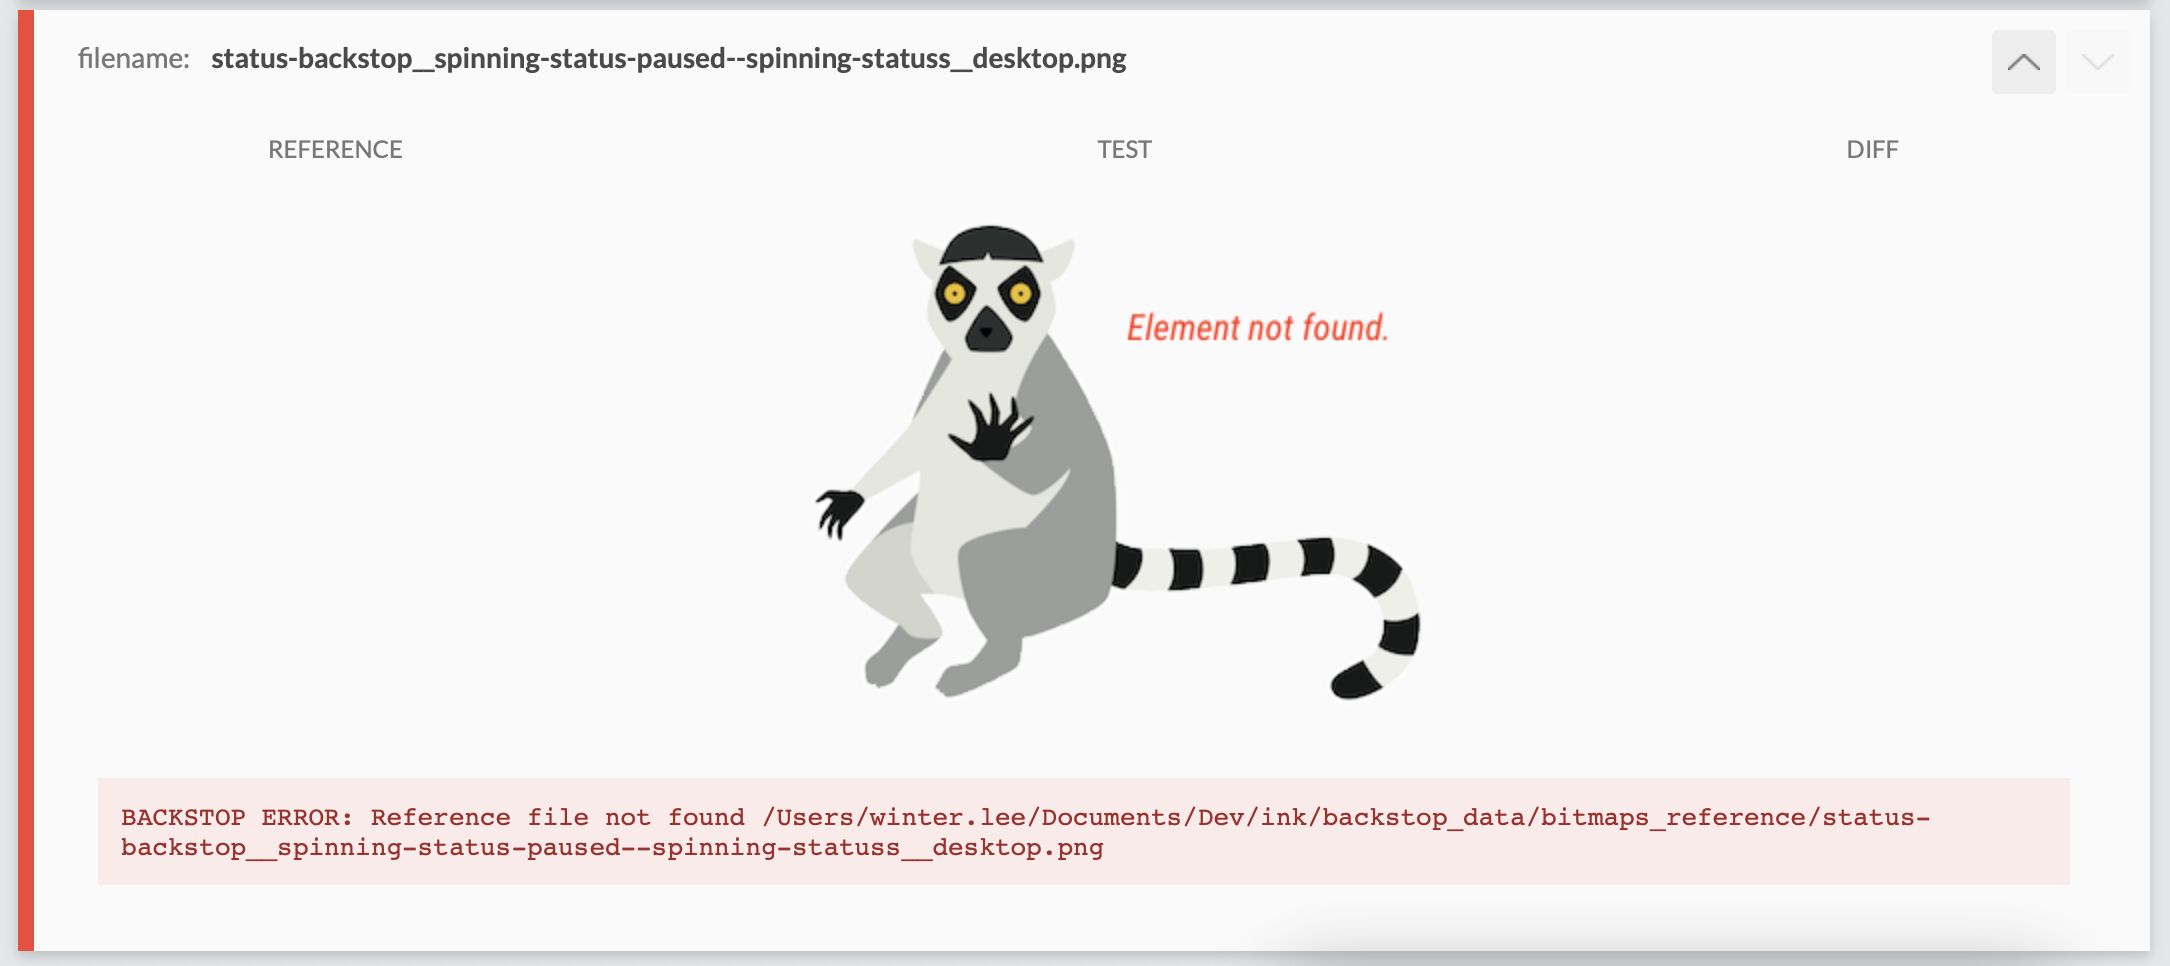
Example of a misspelled selector will bring up a badger:
Approving failing Backstop in the CI
If tests are failing due to intentional changes, you must approve the whole suite (to be used as the next reference) before merging, in your local terminal on your branch locally:
⚠️ Important
Never merge a failing test without checking
$ yarn backstop approve <FAILING_REPORT_URL_FROM_CI># Example url: https://output.circle-artifacts.com/output/job/74206be8-1b50-418b-92d9-36e8c2dbdf37/artifacts/0/backstop_data/html_report/index.html# Using the above, it would look like this:$ yarn backstop approve https://output.circle-artifacts.com/output/job/74206be8-1b50-418b-92d9-36e8c2dbdf37/artifacts/0/backstop_data/html_report/index.html
This generates a commit automatically and you will have to push it up to your branch for Backstop to rerun. It should pass the check. If it doesn't, there's probably a flaky test.